


Publish your Full Stack Web Application online in under 6 Minutes!!
GOAL : By the end of this blog you will be able to publish your website online using Netlify ( for Frontend ) and Heroku ( for Backend ).


Why Publish your work?
1)Build your Credibility

According to Google, around 63 % of the world's population uses the internet. If you build a website on your own and if it just sits in your private GitHub account or your local environment, nobody will know about your work/skills. Publishing your work to the world builds credibility for your Profile.
2) Connect and Network with some awesome people out there who do great work.

Let's be honest! We all have come a long way learning or trying to learn coding after facing tons of errors!! Where do we go then? Stack Overflow it is !!! By asking doubts and contributing, we try to build a community where we help each other by sharing our insights and work so that we can help tons of developers out there.
3) Resolve Issues?

Who knows, while you work on something you indirectly resolve issues of maybe a part of the world. Whether or not, just put it out there !! Share your work and take pride in it. Knowledge gained should certainly be given back to society.
Now let's dive right into how to publish your Web Application online.
*If you have already Pushed your code to GitHub then you can ignore Section 1 and proceed from Section 2 till the end of the Blog.
Section 1 : GitHub
Steps to Push code from your Local Code Editor to Github
1) Create a new Repository by clicking the '+' symbol on the top right corner.
2) On your code editor Terminal type the following commands
git init -b main // Initializing git. For the newer versions of GitHub, the master Branch is the main branch
git remote add origin “ repository link “ // To add a new Remote
git checkout -b new-branch // Creating a new branch for the GitHub repository
git add . // Adds all the files
git status // You can check the files that are modified
git commit -m " Committed changes (added all files) " // Commits all the changes to Git
git push -u origin new-branch // Pushes the code from VS code to the GitHub repository new-branch
3) Once done create a pull request from the new-branch to the main branch, merge and confirm.
Section 2 : Backend via Heroku
Steps to publish the Backend via Heroku
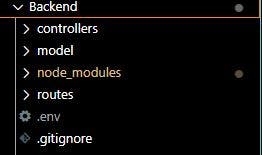
1) Create a file named "Procfile".
In your Backend folder create a file named " Procfile " without any extension and add the following line to it :
web: node app.js // This line tells Heroku to start from app.js. Procfile is the file recognized by Heroku to start our application.
2) Install .env
In your Backend folder terminal type :
npm i dotenv // Installs your .env
3) Create a file named ".env" in your Backend root Directory.
4) Remove the database URL from your app.js or server.js and put it in the .env file.
Inside .env file type :
DATABASE =  .....  // Database URL that you have connected to
PORT =  5000 // Any port that you have connected to locally
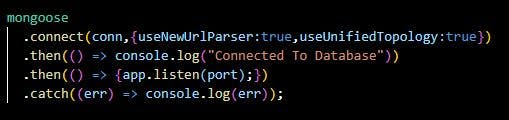
5) In your app.js /server.js (wherever you have declared your database and port ) type the following
require("dotenv").config()  // Introduce the .env configuration
const conn = process.env.DATABASE // Get the DATABASE from .env file
const port = process.env.PORT || 5000 // Get the PORT from .env file

// Replace DATABASE with conn and PORT with port like shown in the image below!
6) Now login or sign up on Heroku
7) Click on "Create a new app". Input an app name of your choice. Select a region of your choice and click on "Create app".
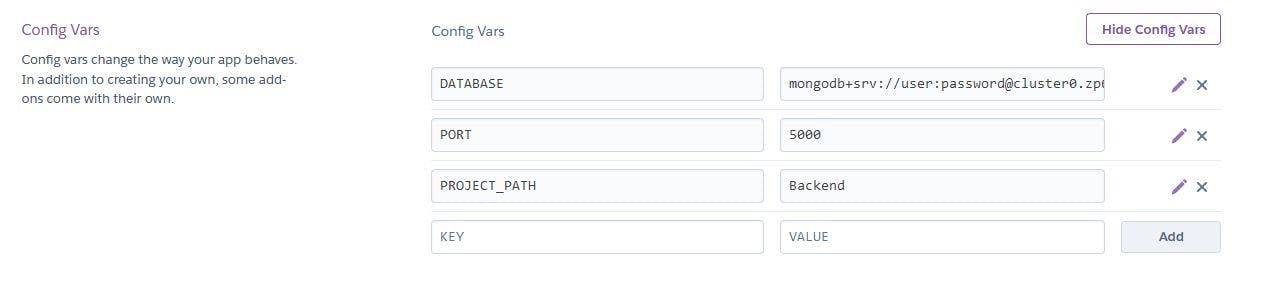
8)Click on " Connect to GitHub". Choose your Repository. Enable Automatic Deploys. 9)Go to Settings. Click on Config Vars. Declare your .env variables there.
10)Click on "Add buildpacks": Choose nodejs ( if your using nodejs for Backend, else whatever is suitable ).

Click on "Add buildpacks" : Paste this link "github.com/timanovsky/subdir-heroku-buildpack"
11) Go back to Deploy
Choose your branch and click "Deploy branch"
12) Once Deployed. Click on "View" and you will be able to view your Website ( Deployed with Backend ).
Possible Reasons for Error
If you receive an application error while Deploying your Backend :
1) Then it's probably because you haven't declared your .env variables in the Config Vars of Heroku settings.
2) Another possible reason could be that it's not realizing your subdirectory. Add buildpacks as stated in Section 3, Step 10.
3) Check if your "dotenv" is installed under dependencies by clicking on "package.json" in your Backend file.
4) Recheck if you have this line "require("dotenv").config()" running.
5) Hope you have executed step 5 in the file that helps your app get started. For example app.js/server.js etc.
Section 3 : Frontend via Netlify
Assuming you have received the Heroku site link we can move forward with deploying Frontend.
Steps to publish Web Application Frontend using Netlify
1) Open a file in the code editor under public, and name it "_redirects".
2) Type the code inside this file :
/* /index.html 200 //This redirect rule will serve the index.html instead of giving a 404 no matter what URL the browser requests.
3) Replace your local host links with the Backend Heroku site URL that you have obtained after deploying Backend.
4) Open Netlify on your web Browser and sign in.
5) Click on " Import from Git "
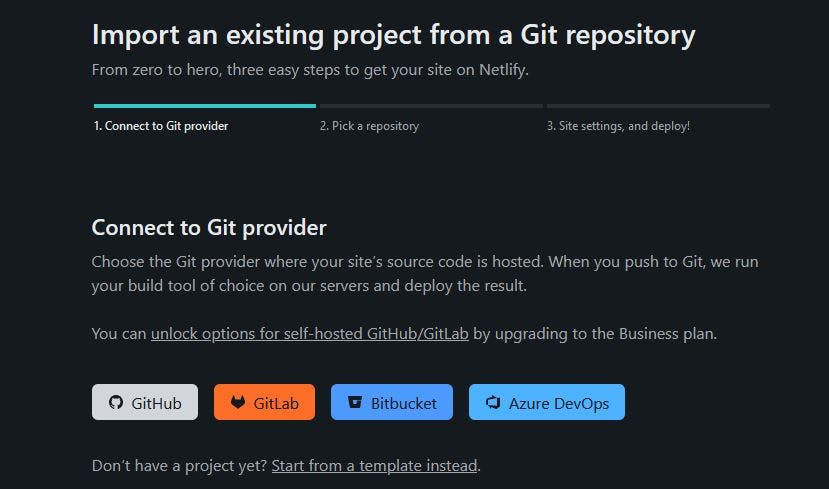
6) Authorize your GitHub Account.
7) Choose The repository :
 Once you Authorize your GitHub account, you can choose The GitHub Repository that you want to publish online ( Frontend ).
8) Fill in your subdirectory details
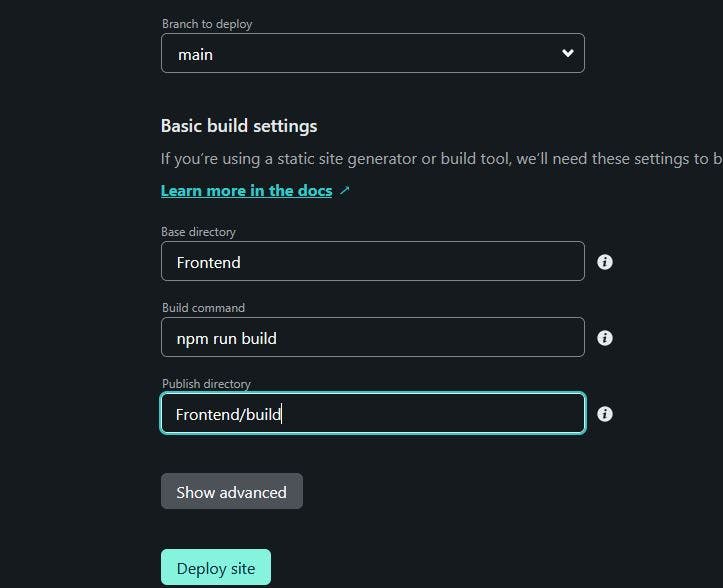
Fill in the subdirectory name from your GitHub. As you can see in my case it was Frontend. Type npm run build to run the build folder.
9) Click on Deploy Site and it will start deploying your Frontend Web application. You can click on Preview and view your site online.
Possible reasons for error
If you receive an error while deploying your Frontend then it could be due to the following reasons:
1) Due to missing "_redirects " file. As Netlify expects one-page applications, Section 2 Step 2 is very important.
2) Didn't execute " npm run build " or didn't declare your subdirectory as step 7 suggests.
3) Did not replace your "localhost:5000" with your Heroku deployed URL in your code editor.
You are Done !! Hurray !!!
Hope you have gained some insight from this Blog!! Thank you for the support !! If you need any further assistance or if you wish to work/collaborate on some interesting projects, feel free to contact me via email at jessicajames1438@gmail.com